Hello 😄,
In this article, I will demonstrate how to configure Kubernetes (minikube) to use OpenID Connect as an authentication strategy.
We will cover the Resource Owner Password flow. Feel free chose the right authentication flow depending on your application’s needs.
Please refer to this diagram in order to choose the flow:
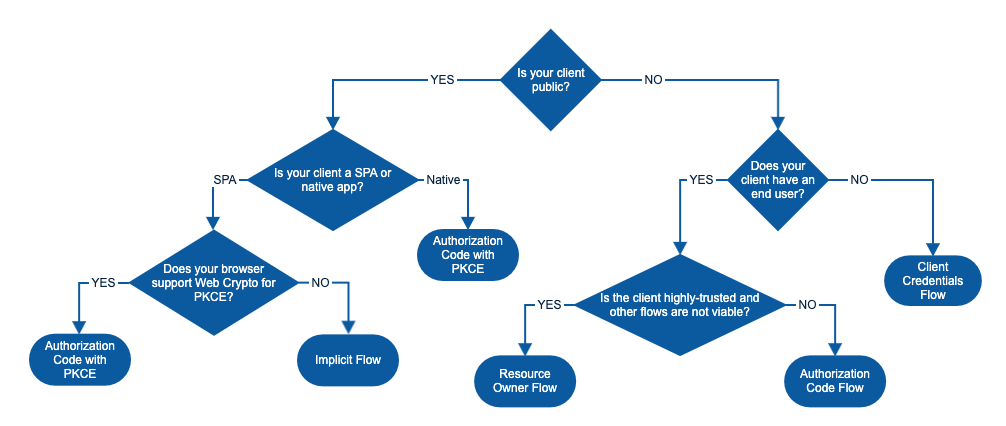 Note that the Client Credentials flow is not supported by Kubernetes. According to the official docs:
“To identify the user, the authenticator uses the id_token (not the access_token) from the OAuth2 token response as a bearer token. “
Since the Client Credentials flow only returns an access_token, we won’t be able to use this flow with Kubernetes.
Setup the OAuth client
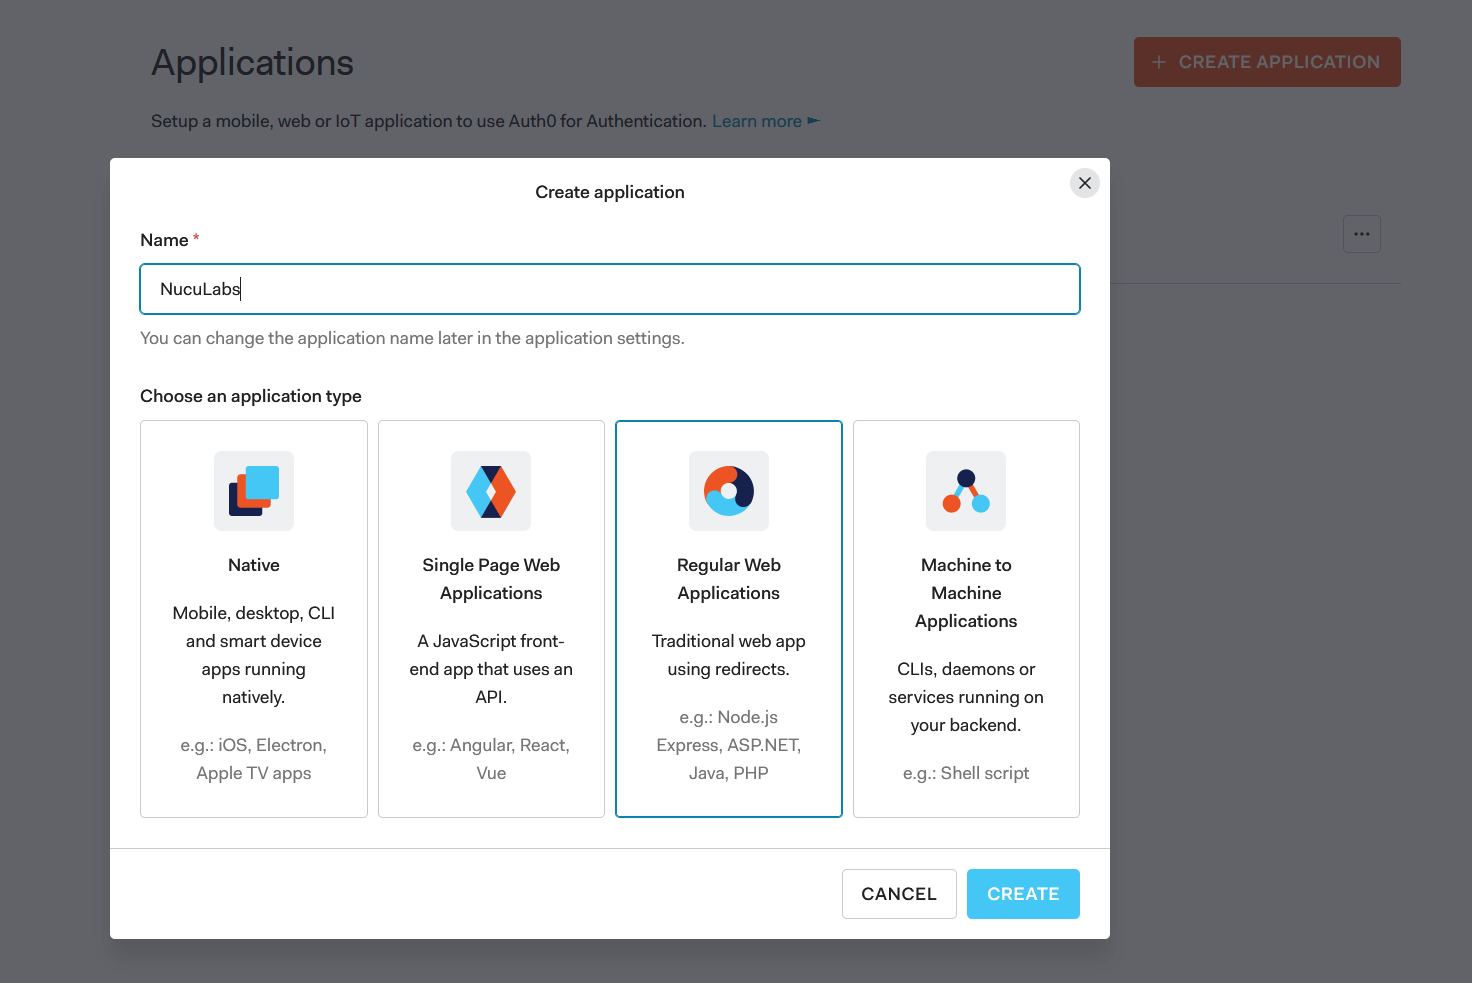
To play around with these concepts we need to create an OAuth application. I prefer to use Auth0 so that everyone can follow along for free.
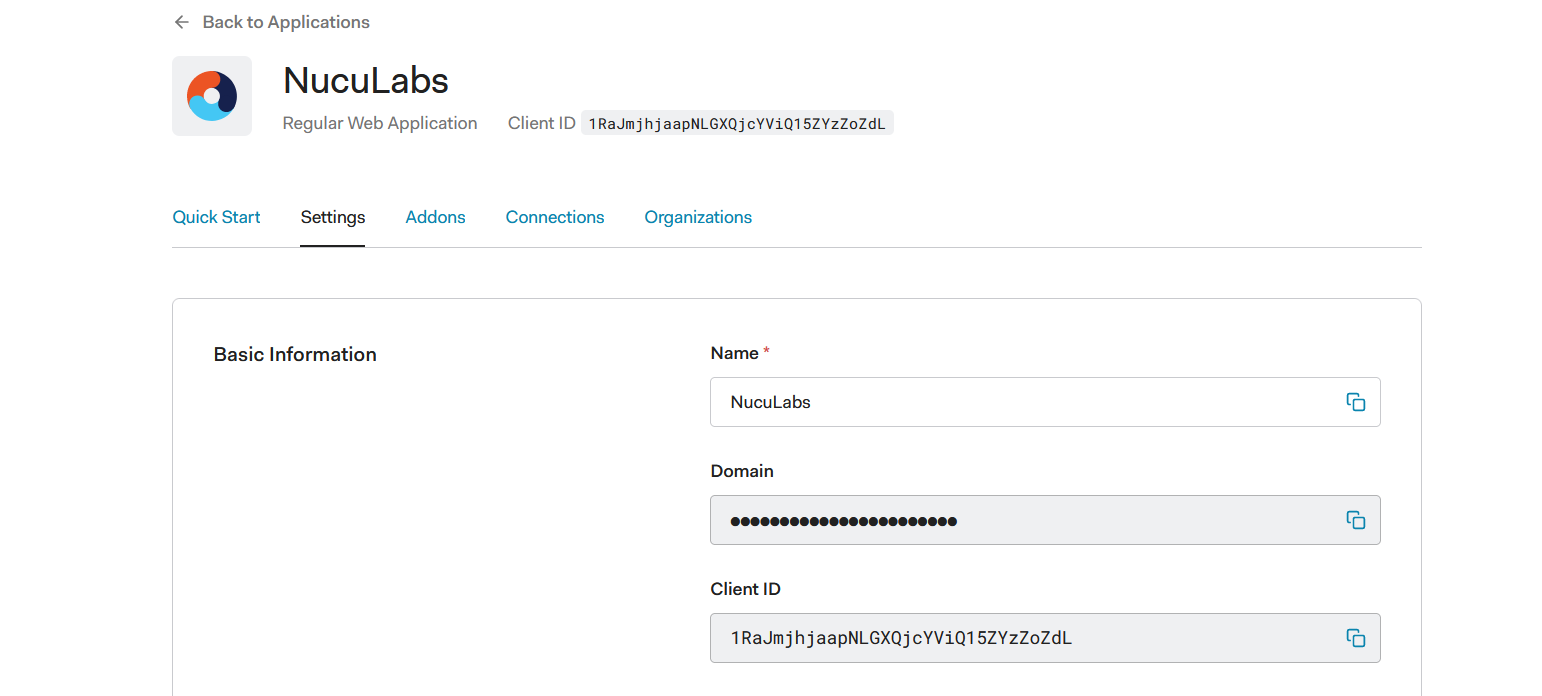
- Create an application of type Regular Web Application
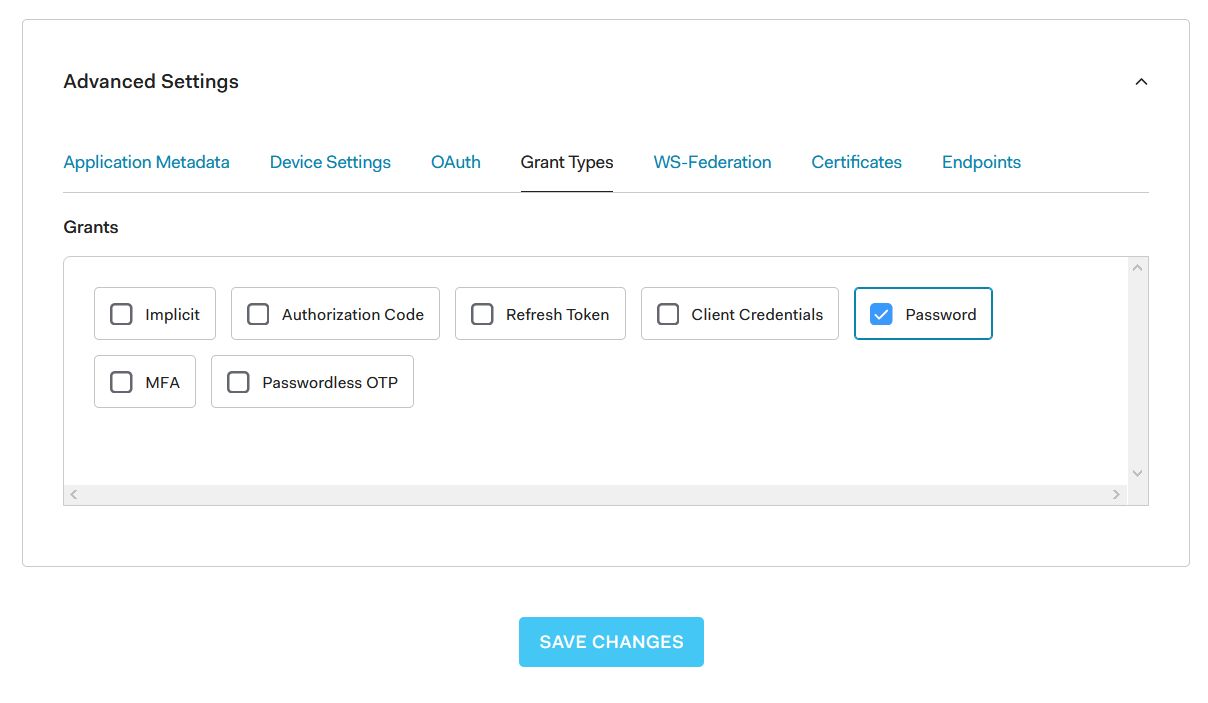
 2. Open the newly created application, go to Settings, scroll down and click advanced settings. On the Grant Types tab click the Password item and hit Save.
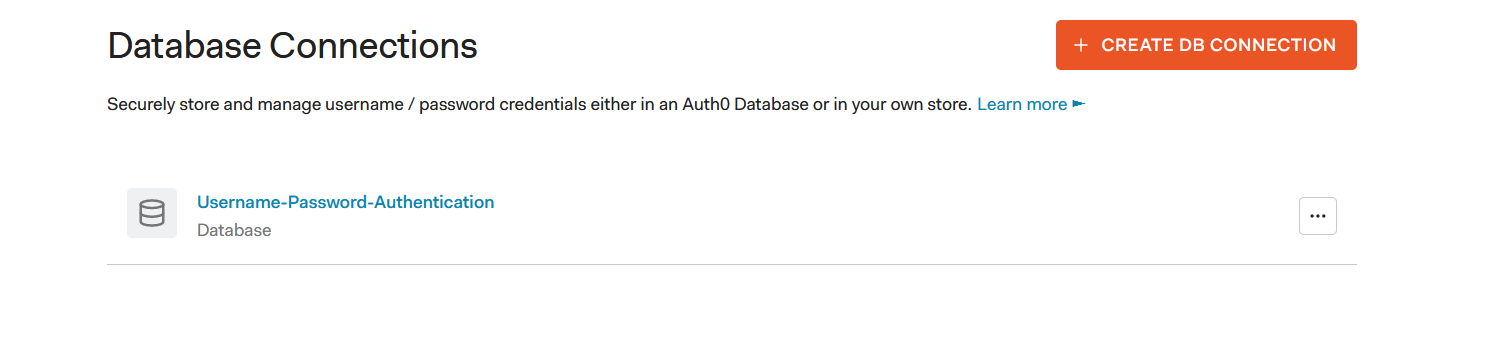
 3. Goto Authentication -> Database and create a new database Connection. I named my connection
 Username-Password-Authentication.
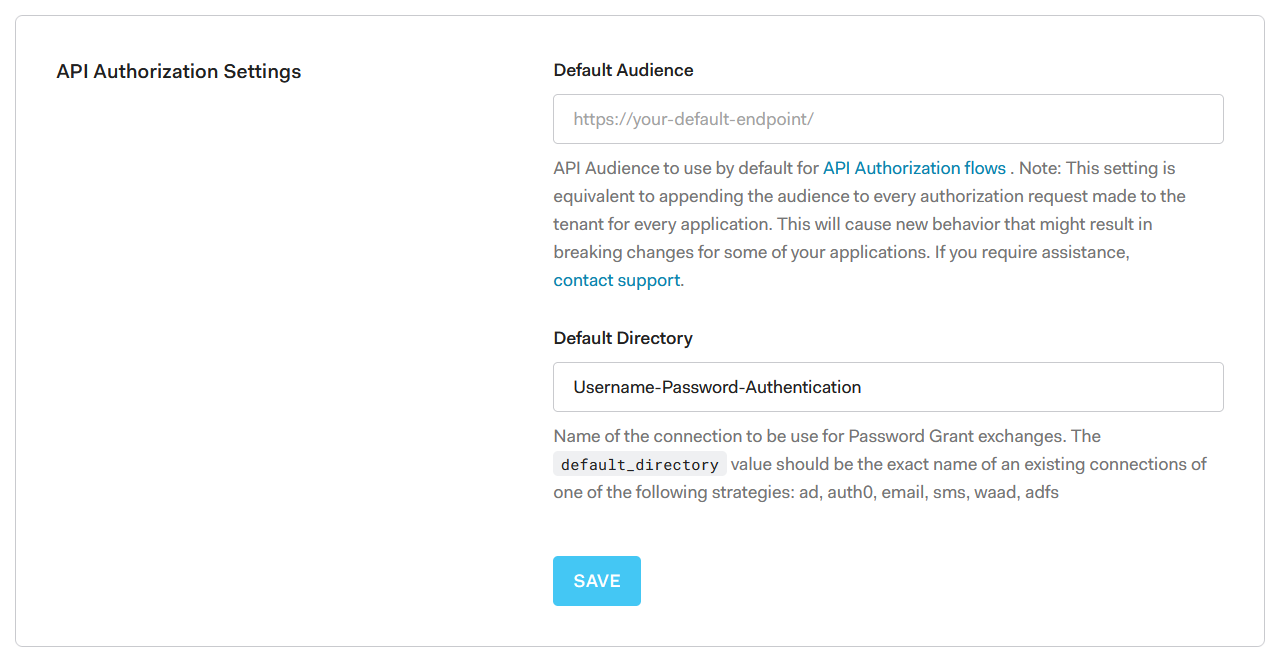
 4. Goto Settings -> Tenant and in the API Authorization Settings section set the Default Directory connection name to
 Username-Password-Authentication
 5. Goto User Management -> Users and create a new user. I named my user: nuculabs-kube@nuculabs.dev and gave it the following password: Pa27rgN9KneN
Next, click on the user and set it’s email address as verified.

Setup Minikube
We can run Kubernetes locally on our computers using Minikube.
If it is your first time playing with Minikube then follow the installation instructions from: and start your minikube cluster with minikube start.
After your cluster is started stop it with minikube stop. This step is necessary otherwise you will encounter errors when running the next command.
Now, let’s start it with the following command:
minikube start --extra-config=apiserver.authorization-mode=RBAC --extra-config=apiserver.oidc-issuer-url="https://xxx.auth0.com/" --extra-config=apiserver.oidc-client-id=1RaJmjhjaapNLGXQjcYViQ15ZYzZoZdL --extra-config=apiserver.oidc-username-claim=email
The --extra-config=apiserver.oidc-issuer-url= must be equal to your Auth0 domain, it must start with https:// and end with a /.
The --extra-config=apiserver.oidc-client-id= will contain the Client ID of the OAuth client.
The --extra-config=apiserver.oidc-username-claim=email will be set to email because we want to map the email of our Auth0 user nuculabs-kube@nuculabs.dev to a user that we will create within Kubernetes.
 Auth0 will return an
 id_token of the form Header.Payload.Signature. In our case, it will have a payload with a field email that will be equal to the user’s email address.
The following token doesn’t include the email claim, but it includes the name claim, in that case, we can use name as our apiserver.oidc-username-claim.
 To play with JWTs visit:
If your Minikube cluster has started you should see the following output:
😄 minikube v1.20.0 on Microsoft Windows 10 Home 10.0.19042 Build 19042
✨ Using the docker driver based on existing profile
👍 Starting control plane node minikube in cluster minikube
🚜 Pulling base image …
🔄 Restarting existing docker container for "minikube" …
🐳 Preparing Kubernetes v1.20.2 on Docker 20.10.6 …
▪ apiserver.authorization-mode=RBAC
▪ apiserver.oidc-issuer-url=https://xxx.auth0.com/
▪ apiserver.oidc-client-id=1RaJmjhjaapNLGXQjcYViQ15ZYzZoZdL
▪ apiserver.oidc-username-claim=email
🔎 Verifying Kubernetes components…
▪ Using image gcr.io/k8s-minikube/storage-provisioner:v5
🌟 Enabled addons: storage-provisioner, default-storageclass
🏄 Done! kubectl is now configured to use "minikube" cluster and "default" namespace by default
Congrats for making it this far! 🎉✨
The next step is to map our nuculabs-kube@nuculabs.dev user to a admin role inside the Kubernetes cluster.
Open your favorite code editor, create clusterrole.yaml and paste the following contents in it:
kind: ClusterRole
apiVersion: rbac.authorization.k8s.io/v1
metadata:
  name: admin-role
rules:
- apiGroups: ["*"]
  resources: ["*"]
  verbs: ["*"]
Next, create clusterrolebinding.yaml and paste:
kind: ClusterRoleBinding
apiVersion: rbac.authorization.k8s.io/v1
metadata:
  name: admin-binding
subjects:
- kind: User
  name: nuculabs-kube@nuculabs.dev
roleRef:
  apiGroup: rbac.authorization.k8s.io
  kind: ClusterRole
  name: admin-role
Apply the role and the role binding in minikube:
kubectl apply -f clusterrole.yaml
kubectl apply -f clusterrolebinding.yaml
Great, now we’ve interacted with the minikube cluster using a client certificate and key and the minikube user.
PS C:\Users\denis\Downloads> cat C:\Users\denis\.kube\config
apiVersion: v1
clusters:
...
users:
- name: minikube
  user:
    client-certificate: C:\Users\denis\.minikube\profiles\minikube\client.crt
    client-key: C:\Users\denis\.minikube\profiles\minikube\client.key
Next, we’ll update kubeconfig to switch to our nuculabs-kube@nuculabs.dev user.
Updating kubeconfig
The kubeconfig file is usually found in the ~/.kube/config directory and it contains information about clusters and users.
To send requests to minikube with the nuculabs-kube@nuculabs.dev user, first we need to grab the id_token:
curl --request POST \
  --url https://xxx.auth0.com/oauth/token \
  --header 'Content-Type: application/x-www-form-urlencoded' \
  --data grant_type=password \
  --data client_id=1RaJmjhjaapNLGXQjcYViQ15ZYzZoZdL \
  --data client_secret=ZzxjjnOfxIj-__pUu7HCRNC9qknS5jYxOsTxd5Koz1uH7AmeXxtRClwlEW6WJLav \
  --data username=nuculabs-kube@nuculabs.dev \
  --data 'password=Pa27rgN9KneN'

{
  "access_token": "yepJxATWNN2hCZUmP4H4BzBaLycsUsJw",
  "id_token": "eyJhbGciOiJSUzI1NiIsInR5cCI6IkpXVCIsImtpZCI6Ik1FSkVNRVE1TWtFMlFrUTRNVEZFTWpZNE5qSkRORFkxTURBMk16bENORVJET1VNelJUSTBPUSJ9.eyJuaWNrbmFtZSI6Im51Y3VsYWJzLWt1YmUiLCJuYW1lIjoibnVjdWxhYnMta3ViZUBudWN1bGFicy5kZXYiLCJwaWN0dXJlIjoiaHR0cHM6Ly9zLmdyYXZhdGFyLmNvbS9hdmF0YXIvMzQ1NjMxNzQxNjU0ODViYWE1NDBjOTBkODc2MzAyN2I_cz00ODAmcj1wZyZkPWh0dHBzJTNBJTJGJTJGY2RuLmF1dGgwLmNvbSUyRmF2YXRhcnMlMkZudS5wbmciLCJ1cGRhdGVkX2F0IjoiMjAyMS0wNS0xM1QxOTo1Nzo0Mi42ODZaIiwiZW1haWwiOiJudWN1bGFicy1rdWJlQG51Y3VsYWJzLmRldiIsImVtYWlsX3ZlcmlmaWVkIjpmYWxzZSwiaXNzIjoiaHR0cHM6Ly9kbnV0aXUtZGV2LmV1LmF1dGgwLmNvbS8iLCJzdWIiOiJhdXRoMHw2MDlkNzlkMjk2OWU3MjAwNjhhNmFhNjciLCJhdWQiOiIxUmFKbWpoamFhcE5MR1hRamNZVmlRMTVaWXpab1pkTCIsImlhdCI6MTYyMDkzNTg2MiwiZXhwIjoxNjIwOTcxODYyfQ.avnUJv2aM0vpTkcoGiO54N4y765BxpXHV2alYAVXCpFeaNI2ISW-lW0sFUFrU3w35oM4p2Xh2tlMmVoQplSvJL0mJ9qZObMDvdqijFGdUbYN3XnD2F0kI5CCwshGhP59cbS_gdXIwwz3SOwDKKjGvacvEPcOofmhcBxNVW16qP7GS2JaAnrbGygCpj6AOyRcCkAL-jz0rxQCPrwZ5i1E4ofsbH0H8cVprYYazBpNRKPWcadcMqvGAXrtkrkSzHvrmTbQNaXi2rUiDzepDeJvciYJsNefLGmW2iStpB4KuN9M0wpXdV2PAd6lMYAd3sYSn_4NYLQKEbtmL5Sp1lkxow",
  "scope": "openid profile email address phone",
  "expires_in": 86400,
  "token_type": "Bearer"
}
Note that the token expires in 86400 seconds, 24 hours, we can only use it in that time interval. Feel free to decode the token on jwt.io to inspect it’s contents. 😀
To tell kubectl to use the id_token we’ve just retrieved, we need to update it as follows:
apiVersion: v1 clusters:
- cluster: certificate-authority: C:\Users\denis.minikube\ca.crt server: https://127.0.0.1:56840 name: minikube contexts:
- context: cluster: minikube namespace: default user: nuculabs-kube@nuculabs.dev name: minikube current-context: minikube kind: Config preferences: {} users:
- name: minikube2 user: client-certificate: C:\Users\denis.minikube\profiles\minikube\client.crt client-key: C:\Users\denis.minikube\profiles\minikube\client.key
- name: nuculabs-kube@nuculabs.dev user: auth-provider: name: oidc config: client-id: 1RaJmjhjaapNLGXQjcYViQ15ZYzZoZdL client-secret: ZzxjjnOfxIj-__pUu7HCRNC9qknS5jYxOsTxd5Koz1uH7AmeXxtRClwlEW6WJLav idp-issuer-url: https://xxx.auth0.com/ id-token: eyJhbGciOiJSUzI1NiIsInR5cCI6IkpXVCIsImtpZCI6Ik1FSkVNRVE1TWtFMlFrUTRNVEZFTWpZNE5qSkRORFkxTURBMk16bENORVJET1VNelJUSTBPUSJ9.eyJuaWNrbmFtZSI6Im51Y3VsYWJzLWt1YmUiLCJuYW1lIjoibnVjdWxhYnMta3ViZUBudWN1bGFicy5kZXYiLCJwaWN0dXJlIjoiaHR0cHM6Ly9zLmdyYXZhdGFyLmNvbS9hdmF0YXIvMzQ1NjMxNzQxNjU0ODViYWE1NDBjOTBkODc2MzAyN2I_cz00ODAmcj1wZyZkPWh0dHBzJTNBJTJGJTJGY2RuLmF1dGgwLmNvbSUyRmF2YXRhcnMlMkZudS5wbmciLCJ1cGRhdGVkX2F0IjoiMjAyMS0wNS0xM1QxOTo1Nzo0Mi42ODZaIiwiZW1haWwiOiJudWN1bGFicy1rdWJlQG51Y3VsYWJzLmRldiIsImVtYWlsX3ZlcmlmaWVkIjpmYWxzZSwiaXNzIjoiaHR0cHM6Ly9kbnV0aXUtZGV2LmV1LmF1dGgwLmNvbS8iLCJzdWIiOiJhdXRoMHw2MDlkNzlkMjk2OWU3MjAwNjhhNmFhNjciLCJhdWQiOiIxUmFKbWpoamFhcE5MR1hRamNZVmlRMTVaWXpab1pkTCIsImlhdCI6MTYyMDkzNTg2MiwiZXhwIjoxNjIwOTcxODYyfQ.avnUJv2aM0vpTkcoGiO54N4y765BxpXHV2alYAVXCpFeaNI2ISW-lW0sFUFrU3w35oM4p2Xh2tlMmVoQplSvJL0mJ9qZObMDvdqijFGdUbYN3XnD2F0kI5CCwshGhP59cbS_gdXIwwz3SOwDKKjGvacvEPcOofmhcBxNVW16qP7GS2JaAnrbGygCpj6AOyRcCkAL-jz0rxQCPrwZ5i1E4ofsbH0H8cVprYYazBpNRKPWcadcMqvGAXrtkrkSzHvrmTbQNaXi2rUiDzepDeJvciYJsNefLGmW2iStpB4KuN9M0wpXdV2PAd6lMYAd3sYSn_4NYLQKEbtmL5Sp1lkxow
Note: The authentication won’t work if the user doesn’t has it’s email verified: E0513 20:03:32.089659 1 authentication.go:53] Unable to authenticate the request due to an error: [invalid bearer token, oidc: email not verified] you will need to create another user or set the user’s email as verified from the Auth0 interface.
To verify that the authentication works save the kubeconfig file and run:
PS C:\Users\denis\Downloads> kubectl get services
NAME         TYPE        CLUSTER-IP   EXTERNAL-IP   PORT(S)   AGE
kubernetes   ClusterIP   10.96.0.1    <none>        443/TCP   33m
If you change a single byte in the id-token, then the authentication won’t work anymore.
✨ We’ve successfully interacted with Minikube with our Auth0 user. ✨
Refreshing the token
Since the Resource Owner flow doesn’t return a refresh_token, the oidc authorization provider plugin for kubectl won’t be able to refresh the token, thus a manual refresh is needed.
The Kubernetes documentation offers a solution for this: ExecCredentials. You can use an existing go plugin or write yourself a program that gets executed and prints an ExecCredential object to stdout, which looks like this:
{
  "apiVersion": "client.authentication.k8s.io/v1beta1",
  "kind": "ExecCredential",
  "status": {
    "token": "my-bearer-token"
  }
}
If an expirationTimestamp is provided along with the token then kubectl will cache the token until the token expires otherwise if the expirationTimestamp is missing then kubectl will use the token until the server responds with 401.
A kubectl file made for an ExecCredentials scenario would look like this:
<pre class="wp-block-code">```
users:
- name: nuculabs-kube@nuculabs.dev
  user:
    exec:
      apiVersion: "client.authentication.k8s.io/v1beta1"
      command: "my-program-that-prints-an-credential"
      args:
      - "print-token"
Thank you for reading 📚!

## References:

- <https://auth0.com/docs/flows/call-your-api-using-resource-owner-password-flow>
- <https://octopus.com/blog/kubernetes-oauth>
- <https://kubernetes.io/docs/reference/access-authn-authz/authentication/#openid-connect-tokens>
- <https://developer.okta.com/docs/concepts/oauth-openid/#what-kind-of-client-are-you-building>

Article cover photo by [贝莉儿 DANIST](https://unsplash.com/@danist07?utm_source=unsplash&utm_medium=referral&utm_content=creditCopyText).